Thursday, September 16, 2010

2010 - Week 37, Remembering to Find Joy

Front Entry
September 13, 2010 3:55 pm
Nikon D90, 35mm
Manual, No Flash, ISO 250, SS 1/50, f/2.8
RAW, Spot Metering, AF-S, WB in Auto

When I started this journey 37 weeks ago I only knew that I wanted to try and learn as much about my camera as possible and try to take a good picture of my girls once a week with something "new" in mind.

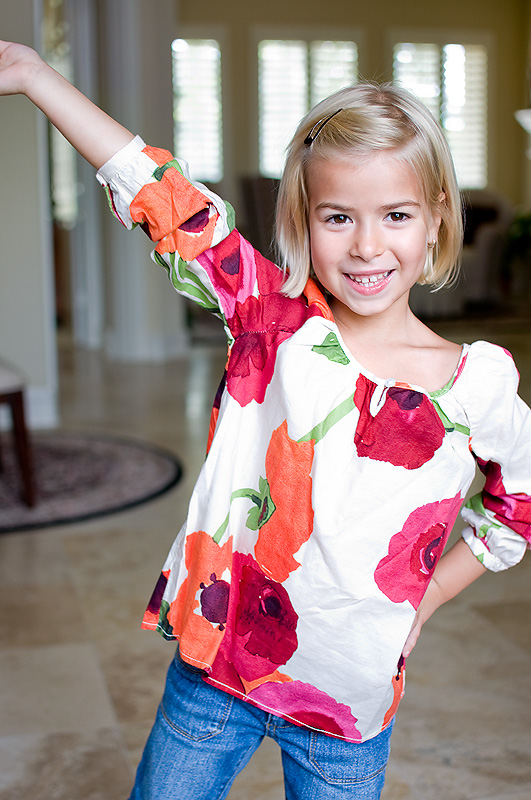
It's getting hard. I'm not as joyful about this project as I was when I started and so this week I'm posting a picture that is joyful but where I didn't try or learn anything new and did a great job of chopping some hands - but its OK, because look at those smiles!!! They were testing out some potential Christmas photo tops and were "striking a pose" using either a dance move or something they've seen on Project Runway - I'm not for sure which.

Week 37 2010 09 13 Outfits 9078 web

Week 37 2010 09 13 Outfits 9080 web

post-processing
did a quick mask of their face and did a slight midtones contrast adjustment...just a touch.

Monday, September 6, 2010

2010 - Week 36, Telephoto Lenses & Depth of Field

Backyard
September 05, 2010 2:28 pm
Nikon D90, 70-300 4.5-5.6 VR @ 300mm
Manual, No Flash, ISO 250, SS 1/200, f/5.6
RAW, Spot Metering, AF-S, WB in Auto

Compositionally, I didn't get the best shot of Alena with the board running up the back of her head, I should have been moving my own feet a bit more. Working with the telephoto lens zoomed all the way out reminds me of using binoculars to go birding (this is easier of course), you have to search a bit sometimes with your lens to get your subjects in the frame. The sun was also going in & out of the clouds, and while they were in the shade and it metered the same it changed the tone of the photos between Iva & Alena.  Alena's is just a bit soft too, one of us moved or I snapped the shot before the camera focused.

Week 36 2010 09 03 New Roof DSC_9007

Week 36 2010 09 03 New Roof DSC_9008

One aspect that creates a nice effect for portraits is depth of field - the ability to separate the subject from the background by having a sharply focused subject and a soft, blurry background.

The easiest way for portrait photographers to do this is use a fixed aperture lens, usually a prime lens - 50mm 1.4 (or 1.8) - is a popular starter lens for a lot of photographers.

I have tried a couple times to explain this to some photography pals of mine and I haven't done a very good job because first of all I don't understand the mechanics of why using a lens with the widest aperture creates the softest effect and smallest depth of field (smallest plane that is focused).

Then to complicate matters, the farther away you are from your subject the deeper your plane of focus will be. For example if I am taking a photo with my 50mm set at f/1.8 from 5 feet away the focused plane depth is only 2.5 inches. If I step back to 8 feet away now the focused plane depth jumps to 6.5 inches, but of course I'm including a lot more of the environment around my subject as well.

When you learn about the exposure triangle you learn that each change in f/stop results in a double or halving of the amount of light entering the sensor. But why on earth is 2.0 half of 1.4? It is because to allow double the light to hit the sensor you have to make the aperture twice as big - and you do that by doubling the radius and then hence the area of the lens opening.

So taking a 50mm lens you divide the focal length (50) by the aperture (1.4) to get the lens opening diameter (35.7) which using some math from school long ago results in an area of 1002 mm^2. For 2.0 the result is 491 mm^2 - pretty darn close to half - so hence f/2.0 is half is f/1.4.

So even though I took these photos with a variable aperture lens which only allows me a maximum aperture of f/5.6 at 300mm, the lens opening is the same if I had used f/1.0 on a 50mm lens (which doesn't exist) or used a 70-200 f/2.8 at f/2.8 at 150mm (which I don't have the budget for that lens).

So does that mean you can get the exact same results using f/2.8 @ 150mm vs. f/5.6 at 300mm? Not exactly because the DOF is also affected by the distance to your subject and you would move closer to fill the frame if you were at 150mm vs. 300mm and so that also changes your distance to the background...but in my few experiments its pretty close.

I did a little quick experiment with this back in April when I had the chance to rent a 28-70 f/2.8 and the 70-200 f/2.8. My experiment wasn't all the scientific because I was in a bit of a rush, but if you look at the rose bushes you will see how the blur really doesn't change much even though the aperture is increased because the focal length is also increased. But you can also see the blur created when the longest focal length in combination with the widest aperture was used.


Did I confuse everyone again?

post-processing
Iva's photo was left alone - the focus and colors were beautiful with the sun coming out behind the clouds.  For Alena I warmed the photo in ACR, but then also added a warming photo filter masked to her, then a cooling photo filter where she was masked out, and then a green photo filter to the foliage to brighten it and make it appear closer to the foliage in Iva's photo.

Monday, August 30, 2010

2010 - Week 35, Manual Focus

Baseball USA
August 28, 2010 5:06 pm
Nikon D90, 70-300 70-300mm 4.5-5.6 VR @ 70mm
Aperture Priority, No Flash, ISO 2000, SS 1/30, f/4.5
RAW, Pattern Metering, Manual Focus, WB in Auto

We were invited to a baseball birthday party. The girls weren't for sure that they wanted to go since it was baseball, but I knew one other girl would be there and I wanted them to try it since they are learning how to hit golf balls.

Turns out baseball was a huge hit and they had lots of fun. I didn't know the layout of the facility and thought we would be farther away from the kids (but still in the same space as them) and only brought my 70-300mm lens as I really haven't had a chance to use it much.

I quickly saw that I was going to have to push the ISO all the way up and I was still going to get slow shutter speeds. Shooting through the netting caused all sorts of focus problems so I switched over to manual focus and picked a place where I wouldn't move so that I could take shots in continuous mode without the camera hunting for focus each shot.

With the slow shutter speeds I got motion blur because the girls were moving as they swung, and I was really happy to have the vibration reduction (image stabilization) even though I was shooting at the shortest end of the focal length.

There was no real reason for me to be in aperture priority, I think I started there because of the variable aperture zoom, but once I saw that I wouldn't need any of my focal length I could have switched back to manual.

I should have thought to go into another cage so I could get shots from the front instead of only the back - but that is 20/20 hindsight for sure.

Week 34 2010 08 28 Baseball DSC_8885

Week 34 2010 08 28 Baseball DSC_8890

post-processing
Adjusted the color & luminance sliders in ACR to temper the noise caused by the high ISO. I couldn't eliminate all the luminance noise without sacrificing a bit of sharpness so some noise is still present.

Friday, August 20, 2010

2010 - Week 34, Making the Best of a Foggy Shot

Front Entry
August 16, 2010 7:33 am
Nikon D90, 50mm 1.8
Manual, No Flash, ISO 200, SS 1/60, f/2.5
RAW, Pattern Metering, AF-S, WB in Auto

We were in a big rush to get out the door on the second day of school (and on the third, fourth, fifth and today the sixth as well).

But they looked SO cute in their casual uniform I had to snap a photo, so I made them come over to the front door the only place first thing in the morning that has a little light.

I dialed in my settings when I took a close up while I was just inside the doorway (why am I still on pattern metering?!?), but all I caught then was a girl yawning.

As soon as I stepped out into the Texas morning humidity my lens fogged up just as I framed the shot & pushed the shutter.

This was such a cute shot I had to use it anyway for their Project 52 book.

And I did learn a few things with this little exercise.

1. Don't forget about the Texas humidity. Even if we had had more than 1 minute to grab a few shots, my lens fogging up would have caused a 5-10 minute delay to get the lens dry and clean.

2. The more important lesson - I should have opened my aperture more or raised my ISO to get back to that rule of thumb of 1/125 with kids (& my shaky hand) - I can see motion blur zoomed in.

Before I even opened it in Camera Raw I was pretty sure the best solution would be to convert to B&W.

So I piddled a bit with it before just deciding to use an action from the Pioneer Woman. I don't use any actions as part of my normal workflow, but if you're looking for an entertaining read or want to try some free Photoshop or PSE actions you should take a look at her blog.

Week 34 2010 08 16 2nd School Day_8831 Edit

post-processing
Week 34 2010 08 16 2nd School Day_8831 SOOC<-- The SOOC shot.


I was able to remove most of the fog by adjusting the exposure in Camera Raw - moving the black in to the edge of the histogram shifted the most of the colors back to normal, but the photo is still soft as a result of my slow-ish shutter speed and the foggy lens.

I ran Pioneer Woman's B&W Beauty action and added a color fill layer in a ultra-soft pink at 30% opacity using a channel mask (only affected areas less than 50% gray) just to change the tone of the photo.

Saturday, August 14, 2010

2010 - Week 33, Posing

Tutti Frutti Yogurt Shop - The First Day of Kindergarten
August 13, 2010 12:37 pm
Nikon D90, 50mm 1.8
Manual, No Flash, ISO 200, SS 1/640, f/1.8
RAW, Pattern Metering, AF-S, WB in Auto

After typing my data in for the photos I chose I realized that just changing lens on your camera and then throwing it in your purse, pulling it out in a hurry and dialing it to Manual and adjusting the shutter speed without thinking is NOT the best way to get the shot you want.

I would have probably not chosen to shoot at f/1.8 because its really hard (for me) to get both eyes in focus when I am that wide open. At f/1.8 and this close you don't even get both eyes & eyebrows in focus, so if you don't get the focal point right you just can't save it at f/1.8.

One of the things I struggle with - and maybe I shouldn't - is getting the "same" picture of both of them. Unless I am shooting them together I am inevitably taking a picture of one of them and then either standing up to shoot over the first one or trying to get girl #2 to be in the same spot as girl #1 was. Alena's glasses add a new dimension to that task.

You can tell I had to shoot over Alena because Iva is looking up at me which causes her eyes to be more open and you can see more of the lashes which is always beautiful if you get the focus. Both of these poses are very pleasing to me though and the wide open aperture and close range allowed the distracting background of the yogurt shop to just blend away - and this is why the 50mm is so popular for portrait photography.

Not noticing that my camera was in pattern metering is what I think caused a difference in white balance that I had to correct in Camera Raw. I almost always use spot metering so I have no idea what I was photographing the other day that I would have switched to pattern/evaluative metering.

2010 08 13 First Day of K DSC_8816 web

2010 08 13 First Day of K DSC_8818 web

post-processing
Adjusted white balance for Iva's photo. Did a level adjustment layer on their iris/pupil to pop the catch lights. Iva's allergies are causing her to have chapped lips right now so I used the healing brush to eliminate most of the dry, flaky skin.

2010 - Week 32, Depth of Field

Kitchen Table
August 7, 2010 8:15 pm
Nikon D90, 50mm 1.8
Manual, No Flash, ISO 1000, SS 1/250, f/1.8
RAW, Spot Metering, AF-S, WB in Auto

I'm so happy that my latest Project 52 photos are more everyday moments in their life, this night the girls were only one week away from starting Kindergarten and they wanted to practice their letters.

This low light situation was perfect for the 50mm 1.8. Even with the lens allowing as much light in as possible I had to crank up the ISO to 1000. With the shutter speed at 1/250 I had one stop of light I could have used. I'm slowly starting to learn that I have to "over-expose" my photos when manually metering to get them to be brighter, and occasionally I remember to meter +2/3 stops, but on this night I didn't, which when I fixed in Camera Raw, shows in the noise you can particularly see in the shadow on the 2nd photo.

Even though I used f/1.8 for both shots, you can see how the DOF varies based on angle and distance.  I had to be further away in the first photo to get both hands in the frame and it's easy to see where the focus starts and then falls off by looking at the letters.    It's harder to see the fall off on the 2nd photo, but I think it starts right after the pen which is a smaller DOF due to me being a couple inches closer.

I also LOVE how Iva is adding curly cues to her letters already.   It probably won't serve her well in Kindergarten to be artistic with her writing, but I love how it shows her creative ability and her free spirit.   She also signs her name Iva ♥ K, which is TOO cute, but not good in a school setting.

2010 08 07 Writing DSC_8574 web

2010 08 07 Writing DSC_8572 Web

post-processing
Adjusted overall exposure in camera raw, and changed WB to Tungsten.

Tuesday, August 3, 2010

2010 - Week 30, Bounced Flash

Family Room
August 1, 2010 8:56 pm
Nikon D90, 18-105 3.5-5.6 VR @ 38mm
Manual, Bounced SB600 Flash, ISO 640, SS 1/40, f/4.5
RAW, Pattern Metering, AF-S, WB in B3

I just love it when the girls lay on the sofa watching TV in this pose. I know they won't fit this way much longer and I wanted to be sure to capture it for their book so they could look back and see more real moments of their lives. Iva has "green", her beloved blanket and we had been at the pool until 8 pm so this is more of how we look on a daily basis.

I decided to wait until nighttime to take a shot so I could try and bounce the flash. I haven't put the SB600 on the camera in months and had never tried bouncing the flash off the wall behind me. I made my sister get the SB600 when she bought her DSLR this spring and I was showing her how to use it when we were back home in June and got much better results bouncing it behind me than off her ceiling - and her walls are deep green.

I started off as close to the bounce flash rule of 4/4/4 guideline - ISO 400, f/4.0, 1/40 as possible, but with the variable aperture lens I wasn't able to get down to f/4.0. I wasn't bouncing off a solid surface either, but instead a bookshelf, so I didn't get as much light reflected back, so bump up my ISO 1/3 stop more than the 1/3 stop aperture difference from the guideline. I didn't check my histogram and was just basing it off the LCD and so I didn't bump it quite far enough (see post-processing note). The first shots were very warm so I adjusted my WB to B3 and got realistic color.

Bouncing the flash behind me allowed me to get larger catch lights than I would have bouncing off the ceiling, and since the light was bounced there are no harsh shadows.

I could have grabbed my 35mm to do this shot, but I like testing things with a kit lens, because its a good example of how the majority of moms with a camera could handle a situation.

Week 31 DSC_8454 TV Watchers Web

post-processing
I had to adjust the exposure in Camera Raw which I could have fixed while shooting if I had been paying any attention to my histogram. Not really an issue with RAW files, but fixing the exposure caused just a hint of noise to come out of the photo - but the good news is that the noise was caused by a default setting in Camera Raw, not really anything to do with the photo itself.

I have been so frustrated by noise and how to fix it in Camera Raw and a post this week by Damien allowed the light bulbs to finally twinkle in my head. Damien lives in Australia, but offers one-on-one Photoshop training via Skype and it was SO wonderful. Sliding the color slider back to 0 cased the bit of graininess I saw to dissolve away. Now if I could just have the same light bulb moment with sharpening for print. I also did a quick level adjustments on just their iris/pupil to make the catchlight pop.

Saturday, July 24, 2010

2010 - Week 30, Catchlights

Master Bedroom South facing windows
July 23, 2010 4:24 & 4:29 pm
Nikon D90, 50mm
Manual, No Flash, ISO 200, f/2.2, SS 1/60 & 1/40
RAW, Spot Metering, AF-S, WB in Auto

Now that Alena has glasses I have the challenge of finding light sources that give beautiful catchlights and don't cause horrible glasses glare. I have not been very successful in getting one without the other so far so this is the challenge I gave myself this week.

It was definitely tricky, I'd have the composition pretty much the way I wanted it (except I kept chopping limbs because I couldn't back up anymore) and the window reflection would be cutting through the middle of her glasses. I shifted myself, the camera, the shutters (which is why the shutter speed for her photo is 2/3 stops slower, I closed off the light adjusting the shutters - which also caused the heavier shadows on her left), before finally finding a spot that only had a little glare on her right lens.

For Iva I was just concerned about getting nice catchlights.  I love looking at the catchlights in professional photos so I can determine the light source.   Catchlights definitely tell a little story about the photo.

Week 30 DSC_8412-Catchlights

Week 30 DSC_8408-Catchlights

post-processing
There wasn't anything that needed to be corrected on these, so they were just converted from RAW to JPEGs. I'm still fiddling around with my trial version of Lightroom, so far I find it more frustrating than useful, but I did figure out where to change my settings from ProPhoto to sRGB and 16 bit to 8 bit - two things that threw me for a loop last week.

Tuesday, July 20, 2010

2010 - Week 29, Panning to Show Motion

Living Room
July 18, 2010 8:17 AM & 11:22 AM
Nikon D90, 35mm
Shutter Priority, No Flash, ISO 320, SS 1/30, f/1.8 & f/2.0
RAW, Spot Metering, AF-S, WB in Auto

Panning to show motion is a great technique that is very hard (for me) to pull off.  It requires panning your camera with your subject so it stays in focus while the shutter is open which causes everything else that is not moving to blur.

Using a slow shutter speed to capture movement allows us to feel the movement more than a higher shutter speed that freezes the motion completely would, and the motion blur allows them to be isolated a little bit from the otherwise distracting background.

The technique is hard because it requires the camera to move only in the same plane that the subject is moving - so no wobbling which for me at 1/30 of a second is almost a given.

I got really lucky and the snapshot of Alena was the very first shot I took.  The one of Iva hours later (I didn't shoot for hours, but it was several hours later before she decided she wanted to play), took many more.  I kept trying to get one of her on her own, but I was not doing a good job of panning in sync with her.  And I actually like seeing Alena in the corner of this shot - it balances her a bit from being so centered.  I played with other focal points, but only had luck with the central focal point.

I don't know why I had my ISO at 320, it wasn't to push the f-stop down.  It may have helped if I had lowered it to 200 and gotten a slightly more closed aperture.  I picked 1/30 because I knew that it was slow enough to show motion, but not so long that I would be getting vertical blur because I was shaking the camera all over the place.

Week 29 - 2010 07 11 Rodeo DSC_8225

Week 29 2010 07 11 Rodeo DSC_8233

post-processing
Since these pictures were taken about 3 hours apart the lighting was different in the room. To the photo that was taken later in the day I added a selective color layer and masked the walls, adjusting the yellow to make the wall color appear more similar.

Friday, July 9, 2010

2010 - Week 28, Program Mode

Driveway
July 5, 2010 8:47 & 8:51 pm
Nikon D90, 50mm
Program Mode, No Flash, ISO 1600, SS 1/40, f/3.2
RAW,Pattern Metering, AF-C, WB in Auto

This winter when I finally wrapped my head around Aperture, Shutter Speed and ISO, I jumped straight from that little green Auto rectangle over to M (manual). I had learned enough to know how to use Aperture Priority and Shutter Priority, but didn't even know what that P even stood for.

Slowly, as I learned all the wonderful settings that I could control beyond the aperture, shutter speed and ISO (focal point, focusing mode, metering mode and white balance are the ones I adjust the most) I finally figured out what P was - it allowed me to have manual control over the focal point, focusing mode, metering mode, white balance and ISO, while the camera chose the aperture and shutter speed required for proper exposure.

With my prime lenses I really didn't have a need for that extra bit of photographing speed that Program mode might provide, but when I bought the used 18-105 VR, and then in June a refurbished 70-300 VR, Program mode became a real option for me.

Using P mode allows me to zoom in and out which changes the aperture and the camera automatically will pick the right shutter speed. This is especially handy on Nikons where the spot metering mode is engaged with the focal point so if your focal point is pointing at a face then you're metering for skin - which is what most portrait photographers are trying to expose perfectly every time.

This week, I was just tired after being gone from home two weeks and wanted to try and get some pictures of the girls playing with sparklers. I didn't even have the energy to drag out the tripod which real firework pictures demand because of the closed (f/11 or higher) apertures and long shutter speeds required.

So for these pictures I just set my ISO fairly high since was JUST before dark, and set the metering mode to pattern because I didn't want to have the light from the sparkler on their face determine the exposure.

The camera did pick a aperture/shutter speed combo that wasn't perfect for this situations of moving kids - golden rule for kids is never less than 1/125, but I would have had to move to manual for that and I wanted to play around with P mode a bit more after using it quite a bit on vacation. 1/40 of a second is pretty slow and there is some softness due to camera shake/kid movement.

I'm becoming more content in creating memories again instead of capturing a perfectly technical image. At the end of the year I'm going to have a book printed for each girl and while it will be my photography journey I also want it to capture the year 2010 for them as it really was. In this case, I really liked how the picture captures how smokey sparklers are and the glow of the sparks falling to the ground.

2010 07 04 Fireworks  DSC_8186_1

2010 07 04 Fireworks  DSC_8195_1

post-processing
I downloaded a trial version of Lightroom 3 to see if it was really so much better than Camera Raw. It's too early for me to tell, but I did use the Noise reduction Luminance slider and I could actually see some reduction in noise when I usually don't in Camera Raw.

Saturday, July 3, 2010

2010 - Week 27, Perspective

Farm Tree Swing
July 1, 2010 4:38 pm
Nikon D90, 50mm 1.8
Manual, No Flash, ISO 250, SS 1/1250, f/4.5
RAW, Pattern Metering, AF-C, WB in Auto

One of the girls favorite things at the farm is the tree swing. The ropes are so long you can't swing yourself, you have to be pushed and my Dad has a special technique for getting kids high. I'll be writing about that on our family blog as I catch up with our vacation photos (hopefully this weekend!).

The blue sky and sycamore trees made such a beautiful backdrop for these shots. I could have knelt down for an even better perspective of them flying in the sky, but I love how it really seems as if they are flying, yet anchored to the earth somehow with the ropes are coming from the corner of the photo.

This was definitely a job for the 50mm, because it is super fast to focus, which makes AF-C so easy to use. Their skin was a bit overexposed in the sun using the pattern metering, so I had to adjust for that a bit in post-processing.

Week 27 2010 07 01 Bange Farm DSC_8093

Week 27 - 2010 07 01 Bange Farm DSC_8097

post-processing

SOOCmask
Week 27 2010 07 01 Bange Farm DSC_8093 smallWeek 27 2010 07 01 Bange Farm DSC_8093 small maskIn ACR I lowered the exposure one stop to save the over-exposed skin areas in full sun. Then in Photoshop, I tried something new by creating a threshold layer, then used the magic wand tool to select all the white areas. I then used the refine edge tool to soften the edges more like a quick mask and soft brush. I added a levels adjustment layer using this selection as the mask, reversing it so I could lighten the image except for the skin (& a few other really bright areas that my threshold exposed).

Friday, June 25, 2010

2010 - Week 26, Larger Depth of Field

The Missouri Farm
June 21, 2010 2:34 pm
Nikon D90, 18-105 3.5-5.6 VR @ 45mm
Manual, Pop Up Flash, ISO 320, SS 1/125, f/13
RAW, Spot Metering, AF-C, WB in Auto
Exposure Compensation -0.66 stops, Flash Compensation -1.66

This picture is important to me.

Not because it's portrays happy, content subjects - really, who could be happy on a humid, 100° day in full sun - never mind city kids who aren't used to being poked and pricked by corn stalks and hay stubble.

This picture is important to me because I wanted it to remember my childhood by.

There are so many memories in this photo, and I don't have a photo with my dad in these cornfields, so a picture of my dad with my own kids will fill that gap.

I remember walking from the house through these fields of corn and then another half mile or so to the creek to go swimming - by ourselves, no adults - and none of us knew how to swim!

I remember the summer we built the east-most grain bin, the thousands of little bolts and nuts we slid in and tightened, and how much fun it was to climb to the top and scramble about, or to go in and wallow in the cool grain - now the thought of that makes the bottom of my feet tingle.  But I loved harvest time - unloading wheat, beans & corn into those bins, climbing up into the wagon or grain truck and sliding down to the opening with the grain.  I didn't seem to mind the bugs and dirt back then.

I remember sorting and working cattle in the pen next to the hay barn. I was Dad's little helper. We broke my first 4H steer, Rags, in that pen. He was so wild we had to build a cage over him to keep him in, but was so tame in the end we let him roam the yard like a pet dog.  We had a milk cow for a while and I was the only one who could milk her when Dad couldn't be there, I remember pinning her tail between my hat and her flank so she wouldn't swat you during the milking.

I remember moving the cattle herd in & out of these fields.  It made us into a family of sprinters.  I remember the standoffs with Horns the cow (mother of Rags) and being rolled in the cockle burrs and stubble when I just couldn't get out of her way fast enough when she came after me.  I did stand my ground one time and clocked her over the head with a stick, but most of the time I just tried to stay out of her way.

I remember one of my most detested chores - pulling weeds by hand out of the soybean fields - YUCK! And one of my favorites, being the one who always got to drive the hay wagon because I was the weakest and couldn't throw a hay bale up on the wagon.  I remember just a few days when Dad would let me skip school to help disc the fields, he did all the spraying and planting, mowing and baling himself.

I could obviously go on for a long time about the memories that come back to me just by looking at this picture.  We moved here when I was just a bit older than the girls are now, so my most vibrant childhood memories are here.  Hopefully someday I'll sit down and write some more stories about those times.

I wanted to try a larger depth of field for this photo because the landscape was important to the meaning of the photo. I bumped up the ISO just a smidge, and then pushed the aperture as closed it would go until I reached what I wanted for a minimum shutter speed. Because it was almost mid-afternoon and I was getting some facial shadows, I popped up my flash, adding negative exposure compensation and then also lowering my flash compensation because I didn't need much flash to add a touch of light to their faces. I would have liked to have played around with some different focus points and maybe throw the leading corn a bit out of focus but have the house a bit sharper, but the girls were not interested in hanging out in the corn field while I played, and it was just a tad hot out there.

Week 26 - 2010 06 21 Farm DSC_7743

post-processing
I added a levels adjustment layer and mask of the upper sky, and slid the blacks in and mid-tones over to bring out the clouds and a bit of blue in the sky.

Friday, June 18, 2010

2010 - Week 25, Manual Exposure with a Kit Lens

Neighborhood Pool
June 12, 2010 7:51 pm
Nikon D90, 18-105 3.5-5.6 VR @ 70mm
Manual, No Flash, ISO 1250, SS 1/500, f/5.3
RAW, Spot Metering, AF-C, WB in Auto

I didn't have any other pictures from this week, and I hated to miss a week in their book, and while this isn't a spectacular photo, swimming is an important part of our summer and the camera technique is an important one.

When moving from the little green rectangle (full auto) on your DSLR to manual, most people suggest getting a fixed aperture lens. Since telephoto lenses that are also fixed aperture cost as much as a well used car, most hobbyists find themselves trying out the prime category, with the "nifty-fifty" (50 mm f/1.8) probably topping the list as the most affordable prime, fixed aperture lens.

The reason that kit lenses (the ones that come with a camera) aren't as handy to use for learning manual is that as you use the zoom to move closer to or farther away from your subject your aperture also changes - which means that if you had a close up shot, and were using a focal length of 55 mm, and then went wide angle to get your toddler's whole body so maybe now you're at 20mm, your aperture changed from f/5.6 to f/3.5 or 1.33 stops, so the shutter speed would also have to change 1.33 stops and most usually by the time you make the changes your toddler has run away and you've missed the shot.

Even on days when I throw a kit lens (this one was bought used at an insanely reasonable price) on my camera I find myself moving to manual so I can control more of what I like to control (metering mode, focus point & focus mode). I'm starting to learn that if I overexpose my images by 1/3 or 2/3 stops they don't need as much brightening in post-processing. I could also do that by using aperture priority and a standard exposure compensation, there is almost always another way to do something - and I'm trying to do them all!

In this case, my aperture was set by my focal length, and I had set my ISO up at 1250 to grab some of the first shots up at the pool where the girls were going down the slide and I needed to freeze the action. I could have lowered it to 800, and still been ok on shutter speed for this one, but the exposure was good and there's very little noise (the biggest problem for high ISO and consumer grade cameras).

Week 25 2010 06 12 FC Pool

post-processing
Pushed the Aqua Hue slider to +48 to make the water more blue, I can't help it - I'm a sucker for blue water and green grass.

Friday, June 11, 2010

2010 - Week 24, Just a Picture

High School Front Lobby
June 11, 2010 10:47 am
Nikon D90, 50mm 1.8 - shot in RAW
Aperture Priority, No Flash, ISO 200, SS 1/40, f/2.8
AF-S, Spot Metering, WB adjusted to B3

Today is just a picture...a RAW file taken into ACR and then converted to a JPG, no fiddling.

Week 24 2010 06 11 Dance Rehearsal_7096 web

Week 24 2010 06 11 Dance Rehearsal_7092 web

post-processing
no PP, although I tried. With the luck I had last week with clarity & vibrance I had to try them again, but they made the image TOO sharp with added clarity, and vibrance just made their skin glow yellow. I also slid clarity & vibrance all the way to -100% just to see and the eyes still stayed clear & sharp.

Sunday, June 6, 2010

2010 - Week 23, Sun Haze

Master Bath Tub
June 2, 2010 8:44 am
Nikon D90, 50mm 1.8 - shot in RAW
Manual, No Flash, ISO 200, SS 1/800, f/2.8
AF-S, Spot Metering

I told myself I wasn't going to take my camera because it was too hot to carry it and pick blueberries, but blueberry picking is so much fun I wanted to have pictures so I brought it along.

Turned out we got there just before the sun rose too high and I was able to get some backlit, sun hazy pictures. Their daddy isn't a fan of this photography style, but I think there are moments when its good.

Week 23 2010 06 02 Blueberries_7054 Sun  Haze

Week 22 2010 06 02 Blueberries_7060 Sun  Haze

I realize that in my post-processing I took out a lot of haze, so I don't know if it still has the same dreamy sort of look that it had SOOC.

Of course, once I got home I got some tips on how to get even better SOOC exposure (main thing being blocking the sun from the sensor so that the camera can meter & focus correctly).

post-processing
This time I did all my edits in camera raw, in the Basic tab I changed Blacks, Clarity & Vibrance. I have a bad habit of making any foliage "green", I just can't help myself. I realize that maybe it takes away some of the warmth of the photo - but I prefer it. To achieve that, under the HSL tab, I slid Yellow + 30, then under Sat I took the greens down - 20, and then under Luminescence I dropped the Greens as well.
Week 23 2010 06 02 Blueberries_7054 SOOCWeek 22 2010 06 02 Blueberries_7060 SOOC

Tuesday, June 1, 2010

2010 - Week 22, Print Big

Our Neighborhood
May 31, 2010 7:55 pm
Nikon D90, 50mm 1.8 - shot in RAW
Manual, No Flash, ISO 320, SS 1/250, f/2.8
Pattern Metering, AF-S, WB adjusted to A4

Week 22 2010 05 31 Print Big_7008 web

This photo did not turn out artistically like I wanted it too. I should have taken the photo in the wee early morning so I could get catch lights in their eyes, and had the light on their face, not their shoulders. I should have put them in a different neighbors yard so that I could get low and get blur more of the house in the background, and have more grass and not so much street, oh and maybe I should have gone with a wider angle lens as well. I may have to do a redo when I get the enlargements of them individually.

But technically, the color was ok, the focus was fine and the photo does capture the main point that this 20x24 print of them is over half the size that they are (and that they are a lot tanner than they were just seven weeks ago).

Taking a picture of them once each week for a for Project 52 after thinking up a theme has proved harder than I thought. So in this case they were clean and their hair was combed and they were agreeable for all of 30 seconds to having a picture taken. Most amazing was how hard it was for them to hold up this very lightweight print. The morning would have been a disaster because they would have dropped it in the wet grass several times.

But my point for this week is don't be afraid to print BIG. I didn't take the photo that was enlarged, but I LOVE having this large print in our home.

Printing large doesn't have to be that expensive (finding a frame can be though). Costco will print a 20x30 for under $10, but it should be mounted on foamboard or matboard so that it can be framed more easily. I like Costco because their print quality is really good (if you turn off auto-correct) and if you don't have access to a professional print lab. MPix (mpix.com) is a consumer sister of a professional lab, I haven't tried it yet, but have heard pretty good things about them.

So, in the future, I'm going to print BIG more often and encourage my friends and family to do the same.

post-processing
In ACR warmed the color balance even more than the adjustment in camera and then used the yellow & green hue sliders to push the grass to green and the green luminance sliders to fine tune the color a bit more.

Sunday, May 30, 2010

2010 - Week 21, In Camera Editing

School Courtyard
May 27, 2010 7:53 am
Nikon D90, 50mm 1.8 - shot in RAW
Manual, No Flash, ISO 200, SS 1/500, f/2.8
AF-S, Spot Metering

Someday, it may be immediately after purchasing your first DSLR, or maybe it will be years later (perhaps after you purchase your second DSLR) you may decide you want to take your photographer further.

When you may that decision, you'll soon find yourself caught up in the exposure triangle, photo editing software and the choice to change from capturing images as JPEGs to capturing them in RAW.

So what the heck is RAW and why should you choose to capture images in this format?

I'll get to that in a minute. For me, the benefits of RAW aren't as easy to understand if you don't know about dynamic range and color space.

First, there is visible dynamic range, the whole range (gamut) of the color space that our eyes can detect.


And you know how after you take a picture of a landscape and have it printed, you may find yourself thinking "it just looked so much better in real life". Well, part of that may be due to the fact that devices able display or print the entire visible color space are, as of yet, an unrealized engineering feat.

So your eye sees a miraculous ranges of hues, your camera is only capable of capturing a portion (pretty big, but not all encompassing) range of hues and then the output device (website or print) is capable of displaying an even smaller portion of that color range. Websites actually display the smallest range of color, which are the hues represented within the white triangle of the above graphic (sRGB).

People have written books about color space, and it can terribly confusing to learn about 16-bit vs 8-bit, ProPhoto vs. RGB vs. sRGB. Suffice it to say, you need to understand the limitations of where your photos will be outputted (displayed or printed) so that they look their best.

So what does all that have to do with making the decision to capture an image in RAW vs. JPEG?

When you capture an image in RAW your camera simply captures the scene and records a file. But what you see on the camera LCD is a JPEG version, not the RAW version, so don't be shocked when you open a RAW file in the beginning and it doesn't look like it did on the LCD.

When you capture an image in JPEG your camera is limited by the the camera's dynamic range ability, is applies any in-camera settings (perhaps you have selected a picture control setting), then the image is further reduced to a reproducible dynamic range (RGB or sRGB), and the photo quality is compressed based on your settings (Fine, Large, Med, etc), and finally it records a file (all in the blink of an eye).

This JPEG format makes things pretty easy because all the images that come off your card are ready to use (if you use sRGB) on the web or send to be printed, but because you've compressed data and truncated the highlights and shadows to get to the reproducible dynamic range, you've lost a bit of the photo and your ability to edit your photos is limited.

That's where the beauty of RAW occurs, you have the full camera dynamic range to work with - you get to choose what data (if any) gets truncated, and a whole smorgasbord of other editing choices depending on your RAW converter of choice (Picassa, Photoshop Elements, Photoshop, Lightroom, etc). RAW files are about twice the size of JPEG files so there really is more data to work with.

But, in a pinch and without access to a computer that has any sort of editing software available your DSLR can convert your RAW files, and allow you to do some edits along the way. This allows you to still retain the advantage of RAW files for edits later on, but also allows you to quickly share a file if needed (You could shoot RAW + JPEG, and get both at the same time, but it fills up your memory card just that much faster and you probably don't need a JPEG of every file, plus the retouch menu allows you to fix some stuff that you wouldn't get on an instant conversion to JPEG, (but that you could apply to JPEGs you've already taken)).

For RAW conversion you have the ability to set the picture quality & size, white balance and exposure compensation, and apply a picture control (standard, neutral, vivid, portrait or landscape).

Week 21 2010 05 27 Preschool Last Day_6997 web


post-processing
2010 05 27 Preschool Last Day_6996 SOOCweb2010 05 27 Preschool Last Day_6996 CEweb2010 05 27 Preschool Last Day_6997 INweb2010 05 27 Preschool Last Day_6996 WDweb
SOOCCustom WB
(my preference)
In Camera WB editWB dropper

As this was my first trip through this process and a bit of an experiment, I simply selected the quality & size I needed and then flipped through the WB menu, selecting Shade as the best match for the location we were in. I could have fiddled further with a custom Kelvin setting, but Shade looked good on the back of my LCD, so I went with it and was able to send the photo right away. After loading the image into ACR to prepare for this post, I found that I preferred a slightly cooler setting. Using the white balance dropper, ACR selected an even warmer WB which was much too warm for my taste.

My Nikon D90 has additional retouching features, that I may have to try out when I'm away from home this summer.
  • D-Lighting for brightening up shadows
  • Red Eye Correction
  • Trim (in camera cropping)
  • Monochrome (convert to BW or sepia)
  • Filter Effects (warm up, cool down, intensify blues, greens, reds)
  • Color Balance (adjust amounts of blue, amber, green & magenta)
  • Small Picture (save for TV, web, e-mail)
  • Image Overlay (combines two RAW files)
  • Straighten (good for beach shots, so that your horizon isn't tilted)
  • Distortion Control
  • Fisheye (make your photo look like you had a fisheye lens)
Wednesday, May 26, 2010

2010 - Week 20, Minimum Focusing Distance

Living Room Couch - light source south facing windows
Mary 24, 2010 5:36 pm
Nikon D90, 50mm 1.8 - shot in RAW
Manual, No Flash, ISO 640, SS 1/50, f/3.2
AF-S, Pattern Metering, WB set to A6 (warm)

Minimum Focusing Distance is probably pretty straight forward for most photographers, but for the amateurs like myself its good practice to know what the minimum focusing distance is for all your lenses.

My 35mm f/1.8 can focus as close as 12", my 50mm f/1.8 can focus as close as 18" and my 18-105mm f/3.5-5.6 VR also focuses at close as 18".

Looking at those values one might assume that to get the best closeup I should use the 35mm because I can move 6" closer to my subject, but since it is also 15mm wider, I really don't gain anything because I "see" more of the subject with the wider lens. At 18" and 105mm I could be really close, but I would also be at f/5.6 which may not give me the shallow Depth of Field (DOF) that I would like to see on such a close up shot.

There is a really neat calculator called the DOF Master (link over on the right) and its good to plug in a few different focal lengths, distances and f-stops to see how much DOF you really have to play with.

For these shots, since I was going to be SO close, I knew I could not shoot wide open (f/1.8) or their eye might be in focus, but not their nose or maybe only one eye. I wanted most of their face to be in focus, and you can see how quickly the focus falls off by the time it gets to their ears.

My next consideration was shutter speed. The rule of thumb for children is to never go less that 1/125th, but since they were sleeping I didn't to worry about movement, so I was safe to go as low as the reciprocal rule or 1/focal length - in this case 1/50 of a second.

So what I had to tweak to get proper exposure was the ISO - which had to get bumped all the way up to 640, which sometimes gives me noise, but with a proper exposure I don't see any in these photos.

How did I get my subjects to "pose"? Well, they didn't get a nap at school because of swimming lessons and then they each worked extra hard during lessons trying to master the roll to your back to take a breath technique since one of them gave me quite the "almost" drowning scare before lessons even started. So we all laid down together on the couch to watch the Disney Planning DVD and it was so exciting we all fell asleep.

I set my focus point to the top set of eyelashes - the girls have amazing thick, dark eyelashes, not so long or curly, but dark and thick. I limited my post processing to fixing only a slight color cast in their hair, because I wasn't going for a perfectly posed portrait, I just wanted to capture them exactly as they looked there on the couch, which is why I manually adjusted the white balance on camera instead of tweaking in Adobe Camera Raw.

2010 05 24 DSC_6969 Sleeping web2

2010 05 24 DSC_6969 Sleeping web

post-processing
In Adobe Camera Raw under the HSL/Grayscale tab, slide the Green Hue slider almost all the way to the left to remove a greenish hue they get in their hair swimming in salt water pools. It was the first time I had attempted this type of adjustment, so it was a pleasant surprise when it actually worked! No further adjustments were made in Photoshop - I'm sure I could have massaged a few of the shadows/highlights on their faces, but it didn't feel right in this instance.